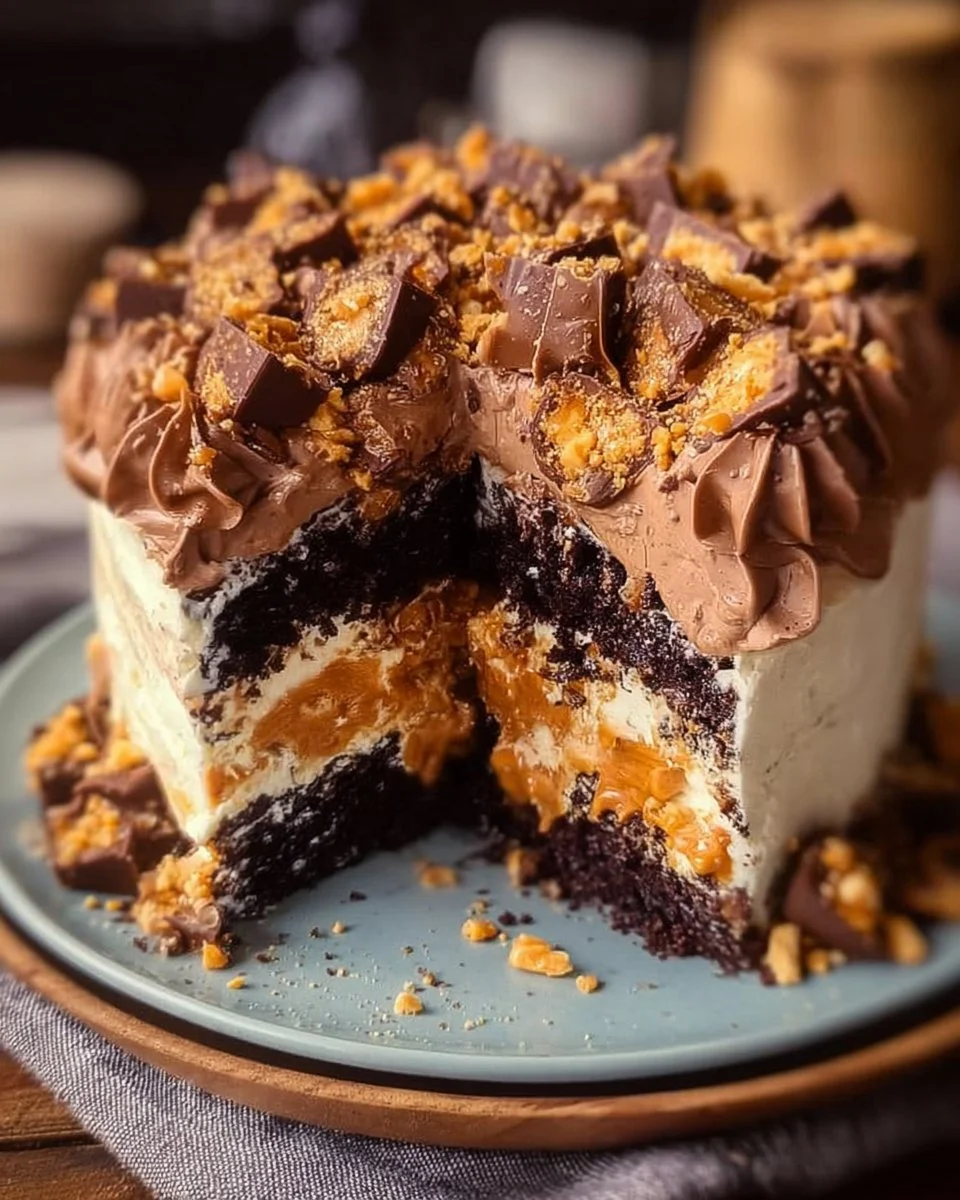
Butterfinger Bomb Cake is a rich, decadent dessert that combines the irresistible flavors of chocolate and peanut butter, topped with a crunchy Butterfinger finish. The cake boasts a moist, fudgy texture with creamy layers that melt in your mouth. As it bakes, a delightful aroma fills your kitchen, heralding a sweet treat that’s sure to impress. This recipe is not only simple to whip up but also perfect for any gathering or a cozy night in.
Why You’ll Love This Recipe
Butterfinger Bomb Cake is the ideal dessert for birthdays, holiday gatherings, or any occasion calling for a indulgent treat. Its easy preparation makes it accessible for bakers of all skill levels, and the combination of rich chocolate and creamy peanut butter is sure to please everyone’s palate. This cake is versatile enough to be dressed up for special occasions or simply enjoyed as a comforting weekday dessert.
Seasonal Ingredients Spotlight
This cake highlights the best seasonal ingredients that add vibrancy and flavor. Rich, dark chocolate cake mix provides a deep, earthy color, while the creamy peanut butter adds a luscious, smooth texture. The Butterfinger bars introduce a delightful crunch, offering an inviting contrast. Fresh heavy cream enhances the cake’s richness, creating a heavenly texture. These ingredients are not only delicious but also accessible and sustainable, making this dessert a natural choice for home bakers.
What You’ll Need
To make Butterfinger Bomb Cake, gather the following ingredients:
- 1 Butterfinger candy bar (for garnish)
- 1 box of chocolate cake mix
- Eggs (as required by cake mix)
- Vegetable oil (as required by cake mix)
- Water (as required by cake mix)
- 1 cup creamy peanut butter
- 1 cup heavy cream
- 1 cup powdered sugar
- 1 teaspoon vanilla extract
- Chocolate frosting
For texture and flavor, opt for high-quality peanut butter without added sugars. For dietary swaps, vegan butter can replace heavy cream, and gluten-free cake mix can be used for a gluten-free version.
How to Make This Recipe
Preheat the Oven
Preheat your oven according to the instructions on the cake mix box. This will ensure even baking and a perfect rise.Prepare the Cake Batter
In a large bowl, combine the chocolate cake mix, eggs, vegetable oil, and water as directed. Mix until the batter is smooth and well combined, with a rich chocolate aroma filling the air.Bake the Cake
Pour the batter into prepared cake pans and bake according to package directions. You’ll know it’s done when a toothpick inserted into the center comes out clean.Make the Peanut Butter Filling
In a separate bowl, beat together the creamy peanut butter, heavy cream, powdered sugar, and vanilla extract until smooth. The mixture should be light and fluffy, evoking a sweet, nutty aroma.Layer the Cakes
Once the cakes cool, layer them with the peanut butter mixture in between. This filling adds a wonderful creaminess that complements the dense cake.Frost the Cake
Frost the top and sides of the cake with chocolate frosting, creating a luscious chocolate exterior that beckons to be enjoyed.Crush and Garnish
Crush the Butterfinger candy bar and sprinkle on top for a crunchy finish that adds texture and sweetness.Chill Before Serving
Chill the finished cake in the refrigerator for a while before serving. This helps the flavors meld beautifully and makes for easier slicing.
Step Examples
Prepare the Base: Start with a clean workspace to prevent any mix-up. Grease your cake pans and have all your ingredients ready; the aroma of the chocolate mixture will be intoxicating.
Mix the Ingredients: Combine your ingredients until you achieve a smooth batter, with a glossy sheen that promises richness.
Shape or Cook: Pour the batter evenly into the pans, ensuring even levels for consistent baking. Keep an eye on the time to achieve that perfect cake rise.
Finish or Garnish: After frosting, take care to garnish evenly with crushed Butterfingers for that delightful crunch.
Serve and Enjoy: Slice into this indulgent creation and watch as the creamy peanut butter layers ooze slightly. The combination of textures — soft cake, creamy filling, and crunchy topping — will certainly delight your taste buds.
Essential Tools
To successfully make Butterfinger Bomb Cake, you’ll need some essential kitchen gear:
- Mixing bowls (for batter and frosting)
- Electric mixer (for quickly blending ingredients)
- Measuring cups and spoons (to ensure accuracy)
- Cake pans (two 9-inch rounds recommended)
- Spatula (for frosting and layering)
- Serving platter
Meal Prep & Storage Tips
For best results, Butterfinger Bomb Cake can be made a day ahead, allowing the flavors to meld beautifully. Store leftovers in an airtight container in the refrigerator for up to five days. If you want to freeze portions, wrap slices tightly in plastic wrap and then place them in a freezer-safe container.
Perfect Pairings
Enjoy Butterfinger Bomb Cake with a glass of cold milk or a rich cup of coffee. Its decadent flavors pair beautifully with vanilla ice cream for an indulgent dessert experience. You might also consider serving it alongside fresh berries, which provide a slight tartness that balances the sweetness.
Nutrition Facts
- Calories: ~180 kcal
- Fat: 8 g
- Carbohydrates: 24 g
- Protein: 3 g
- Fiber: 1 g
- Sugar: 14 g
Avoid These Common Pitfalls
Dough Too Dry: If your batter seems thick, add a splash of milk until it’s pliable and smooth.
Chocolate Coating Breaks: Ensure your melted chocolate frosting is smooth and warm as it can harden quickly.
Unevenly Shaped Cakes: Use a cookie scoop for even filling and dipping consistency.
Pro Tips for Best Results
- Use high-quality ingredients, especially the chocolate and peanut butter, for maximum flavor.
- Allow the cake to cool completely before applying frosting; this prevents melting and sliding.
- Try drizzling melted chocolate over the frosting for a gorgeous finish.
Recipe Variations to Explore
- Salted Caramel Version: Drizzle caramel sauce between the layers for an added twist.
- Nutty Banana Addition: Slice ripe bananas and layer them with the peanut butter for a delicious flavor combo.
- Gluten-Free Option: Substitute the chocolate cake mix with a gluten-free variety for a suitable alternative.
Dietary Adaptations & Safety Info
To accommodate various diets, this recipe can be adapted:
- For Vegan: Use plant-based butter and a vegan cake mix.
- Gluten-Free: Ensure the cake mix is labeled gluten-free and check all other ingredients for hidden gluten.
- Allergens: Be mindful of nut allergies when serving.
Frequently Asked Questions
Can I use homemade cake instead of store-bought mix?
Absolutely! Just ensure it’s a rich chocolate cake to pair well with the peanut butter filling.How long will leftovers last?
If stored properly in an airtight container, leftovers will last for up to five days in the refrigerator.Can I freeze the cake?
Yes! You can freeze slices wrapped tightly in plastic wrap for up to 3 months.What can I substitute for heavy cream?
You can use coconut cream or a non-dairy heavy cream alternative to keep it dairy-free.How can I make this cake look more festive?
Consider adding seasonal sprinkles or colored whipped cream for birthdays or holiday celebrations!
Final Thoughts & Next Steps
Butterfinger Bomb Cake is not just a feast for the eyes, but a delight for the senses. We hope you try this recipe and share your delicious results! Tag your creations with us, and be sure to check out our other dessert recipes here. Happy baking!
Butterfinger Bomb Cake

A rich and decadent dessert combining chocolate and peanut butter, topped with a crunchy Butterfinger finish.
Cake Ingredients
- 1 box chocolate cake mix (Use high-quality cake mix for best results.)
- as required Eggs (Follow the instructions on the cake mix box.)
- as required Vegetable oil (Follow the instructions on the cake mix box.)
- as required Water (Follow the instructions on the cake mix box.)
Filling Ingredients
- 1 cup creamy peanut butter (Use high-quality peanut butter without added sugars.)
- 1 cup heavy cream (Can substitute with non-dairy heavy cream alternative.)
- 1 cup powdered sugar (Add more or less to taste.)
- 1 teaspoon vanilla extract (For flavor enhancement.)
Toppings
- 1 bar Butterfinger candy bar (For garnish.)
- 1 container Chocolate frosting (For frosting the cake.)
Preparation
- Preheat your oven according to the instructions on the cake mix box.
- In a large bowl, combine the chocolate cake mix, eggs, vegetable oil, and water as directed. Mix until the batter is smooth.
Baking
- Pour the batter into prepared cake pans and bake according to package directions until a toothpick inserted comes out clean.
Filling Preparation
- In a separate bowl, beat together the creamy peanut butter, heavy cream, powdered sugar, and vanilla extract until smooth.
Assembly
- Once the cakes cool, layer them with the peanut butter mixture in between.
- Frost the top and sides of the cake with chocolate frosting.
- Crush the Butterfinger candy bar and sprinkle on top.
Final Touch
- Chill the finished cake in the refrigerator before serving.
For best results, make the cake a day ahead. Store leftovers in an airtight container in the refrigerator for up to five days. If freezing, wrap slices tightly in plastic wrap.