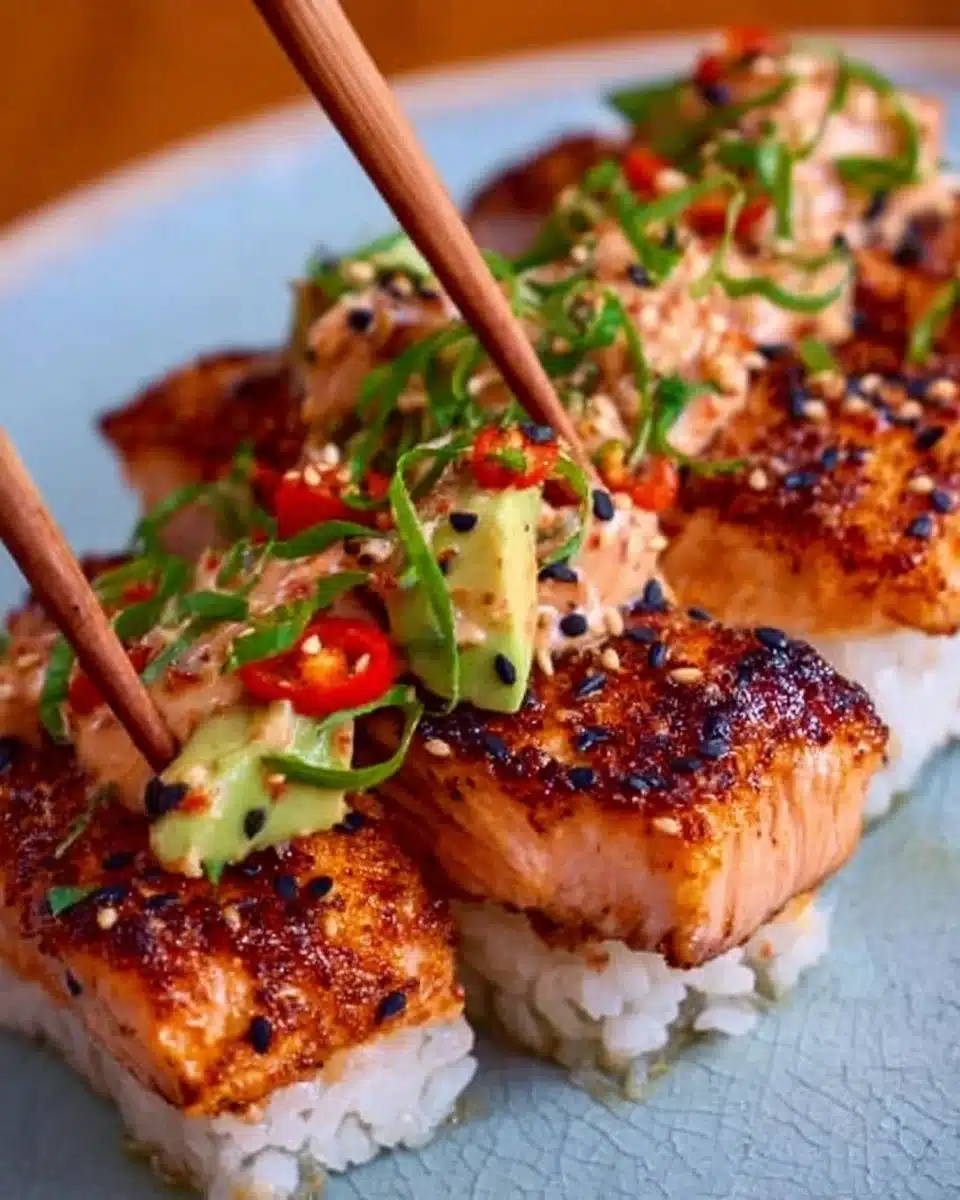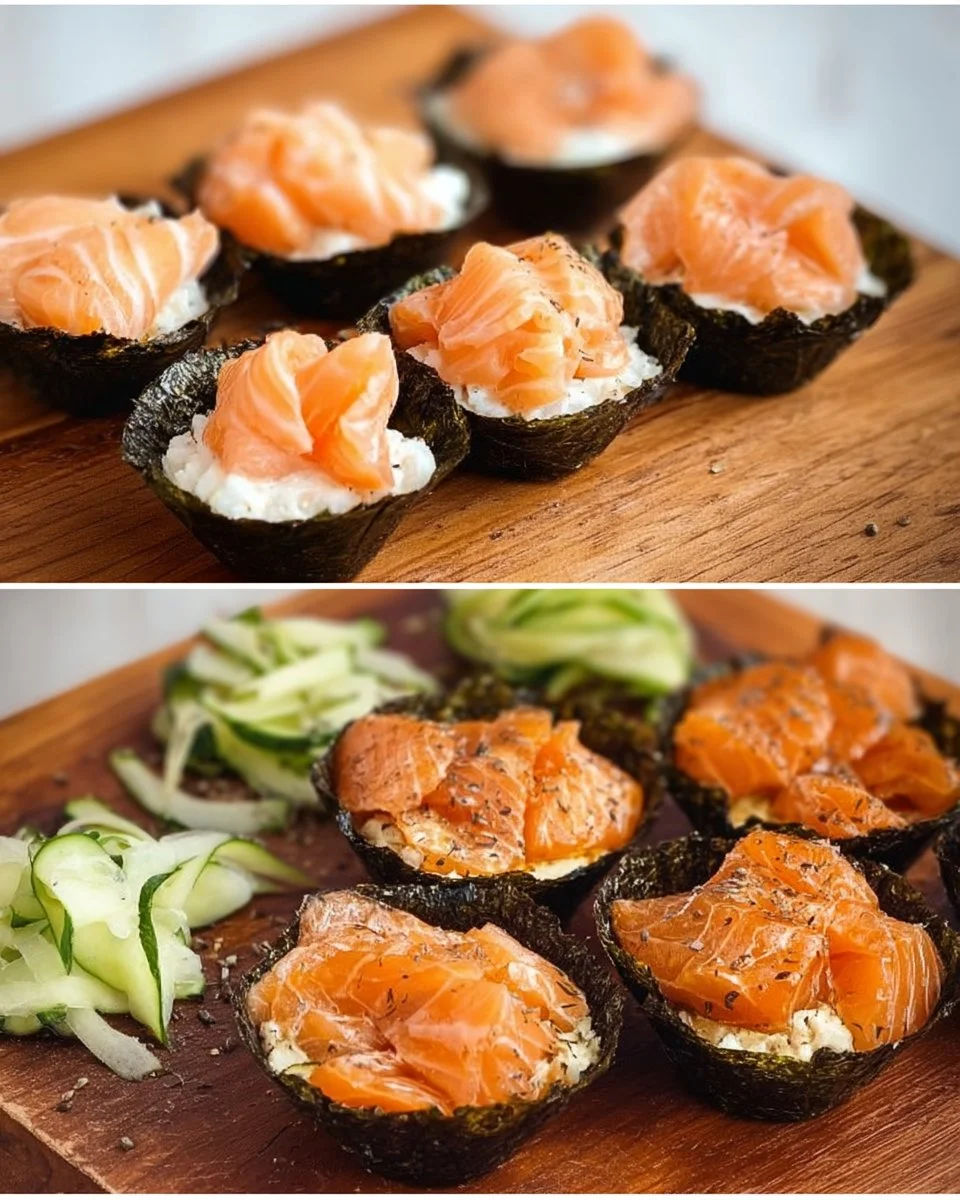
Easy Baked Salmon Sushi Cups are a delightful fusion of flavor and convenience that everyone will adore. Picture a warm, savory bite filled with tender salmon and creamy sauce, all nestled in a crispy rice shell. The aroma wafts from the oven, teasing your taste buds before you’ve even taken a bite. Perfect for gatherings or cozy nights in, these sushi cups are not only easy to whip up but also celebrate seasonal ingredients, making them a sustainable choice for any meal.
Why You’ll Love This Recipe
Looking for a stellar addition to your next party or a comforting dinner? Easy Baked Salmon Sushi Cups have you covered! Their delightful blend of textures and flavors makes them a hit for any occasion—be it a casual weeknight dinner or a festive celebration. With the convenience of muffin tins, they’re incredibly easy to assemble, allowing you to enjoy the deliciousness without the fuss. Plus, you can customize them to fit your taste, making them versatile enough to satisfy everyone at the table.
Seasonal Ingredients Spotlight
This recipe highlights the vibrant fresh ingredients of the season. The salmon, with its lovely pink hue, pairs beautifully with the deep green nori and bright bits of green onion garnishing the top. The unmistakable umami aroma of the sesame oil complements the rich flavor of the salmon, creating a dish that’s as pleasing to the senses as it is to the palate. Sourcing sustainable seafood not only supports eco-friendly practices but also ensures you’re serving the freshest ingredients that make every bite special.
What You’ll Need
- 1 lb salmon, cubed
- 1 tbsp light soy sauce
- 1 tbsp Kewpie Mayo
- 1 tbsp Sriracha
- 1 tsp sesame oil
- 1 ½ cup uncooked sushi rice
- 1 tbsp rice vinegar
- 2 tsp white sugar
- 3 large nori sheets
- Furikake, for garnish
- 1 green onion, for garnish
- Cooking spray
These vibrant, fresh ingredients will provide a delicious balance of flavors and textures. If you prefer a different protein or need a vegetarian option, you can substitute tofu for the salmon or use tamari instead of soy sauce for a gluten-free alternative.
How to Make This Recipe
1. Cook the Sushi Rice
Cook sushi rice according to package instructions. Once prepared, the rice should be sticky and fluffy, providing a great base for your sushi cups.
2. Prepare the Vinegar Mixture
In a microwave-safe bowl, combine rice vinegar and sugar. Microwave for about 30 seconds, or until the sugar dissolves. Pour this mixture over the cooked rice, mixing until evenly coated. Set aside while you prepare the salmon mixture.
3. Preheat the Oven
Set your oven to 400℉. This will ensure even cooking and a crispy exterior for your sushi cups.
4. Mix the Salmon Ingredients
In a bowl, combine diced salmon, soy sauce, Kewpie mayo, sriracha, and sesame oil. Mix well until the salmon is evenly coated. The combination of creamy mayo with spicy sriracha adds a delightful punch.
5. Cut the Nori
Cut the nori sheets into squares large enough to fit into a muffin tin. This will serve as the base for your sushi cups.
6. Assemble the Sushi Cups
Lightly grease the muffin tin with cooking spray. Place a square of nori in each muffin tin slot, then add a spoonful of sushi rice to the center and gently press down. Repeat until each slot is filled, then layer the salmon mixture on top of the rice.
7. Bake the Cups
Bake in the preheated oven for 15 minutes, or until the salmon is cooked through and the tops are golden brown. The wonderful aroma will fill your kitchen at this stage!
8. Cool and Garnish
Once baked, remove the sushi cups from the oven and allow them to cool for a few minutes. Drizzle with additional sriracha or spicy mayo, then sprinkle furikake and chopped green onions on top. Serve immediately and enjoy the burst of flavors!
Essential Tools
- Muffin tin
- Microwave-safe bowl
- Mixing bowls
- Cutting board
- Sharp knife
These essential tools are key to successfully crafting your sushi cups. A quality muffin tin ensures even cooking, while a sharp knife will make cutting the nori a breeze.
Meal Prep & Storage Tips
If you’re looking to make these sushi cups ahead of time, you can prepare the rice and salmon mixture a day in advance. Store them separately in airtight containers in the refrigerator. For best results, assemble and bake them just before serving. Leftovers can be stored in an airtight container in the fridge for up to two days but are best enjoyed fresh.
Perfect Pairings
Serve your Easy Baked Salmon Sushi Cups with a refreshing cucumber salad and a side of edamame for a complete meal. A chilled glass of sake or a light, crisp white wine pairs beautifully, enhancing the flavors without overpowering them. The presentation is beautiful, with the colorful garnishes adding visual appeal to your table.
Nutrition Facts
- Calories: ~180 kcal
- Fat: 8 g
- Carbohydrates: 24 g
- Protein: 3 g
- Fiber: 1 g
- Sugar: 14 g
Avoid These Common Pitfalls
- Overcooked Rice: Ensure you follow the package instructions closely to avoid mushy rice.
- Too Much Salmon Mixture: Balance the rice and salmon for optimal flavor in each bite.
- Soggy Nori: Make sure to press the rice firmly but gently into the nori to create a sturdy cup.
Pro Tips for Best Results
- For extra flavor, toast the nori lightly before assembly to enhance its crunch.
- Experiment with different toppings like avocado or pickled ginger for added flair.
- Serve with dipping sauces to elevate the meal and personalize flavors.
Recipe Variations to Explore
- Spicy Tuna: Swap the salmon for spicy tuna mix using raw sushi-grade tuna.
- Vegetarian Delight: Substitute cooked sweet potatoes or tempura veggies for a meat-free version.
- Flavored Rice: Add a dash of mirin or sesame seeds to your rice for additional layers of flavor.
Dietary Adaptations & Safety Info
For those with dietary restrictions, this recipe can easily be adapted. Use gluten-free soy sauce or tamari for gluten-free options, and substitute the mayo with vegan mayonnaise for a dairy-free version. Always check for allergens in specific brands, especially with sauces.
Frequently Asked Questions
1. Can I use frozen salmon for this recipe?
Yes! Just ensure it’s fully thawed and drained before using.
2. Is it safe to make sushi cups with raw fish?
As long as you use sushi-grade fish and handle it properly, it should be safe. Always follow local guidelines for seafood safety.
3. How do I know when salmon is cooked through?
The salmon should be opaque and flaky. You can also use a food thermometer—a safe internal temperature for salmon is 145℉.
4. Can I prepare the rice in advance?
Absolutely! Cook it a day before and store it in the refrigerator. Just make sure to warm it slightly before assembly to make it easier to handle.
5. What can I do with leftovers?
Store the sushi cups in an airtight container in the fridge for 1-2 days. Reheat them in the oven for about 5-10 minutes before serving to re-crisp the nori.
Final Thoughts & Next Steps
Now that you have this delicious recipe for Easy Baked Salmon Sushi Cups, it’s your turn to try making them! Join our community by sharing your creations and let us know how yours turned out. Don’t forget to check out more fabulous recipes in our interactive cookbook!
Easy Baked Salmon Sushi Cups
 1")
Delightful fusion of tender salmon and creamy sauce, all nestled in a crispy rice shell, perfect for gatherings or cozy nights in.
For the Sushi Cups
- 1 lb salmon, cubed (Can substitute with tofu for a vegetarian option.)
- 1 tbsp light soy sauce (Use tamari for a gluten-free alternative.)
- 1 tbsp Kewpie Mayo
- 1 tbsp Sriracha
- 1 tsp sesame oil
- 1.5 cup uncooked sushi rice
- 1 tbsp rice vinegar
- 2 tsp white sugar
- 3 large sheets nori
- to taste Furikake, for garnish
- 1 large green onion, for garnish
- as needed Cooking spray (For greasing muffin tin.)
Preparation
- Cook sushi rice according to package instructions. Once prepared, the rice should be sticky and fluffy.
- In a microwave-safe bowl, combine rice vinegar and sugar. Microwave for about 30 seconds, or until the sugar dissolves. Pour this mixture over the cooked rice, mixing until evenly coated.
- Set the rice aside while you prepare the salmon mixture.
- Preheat your oven to 400°F.
- In a bowl, combine diced salmon, soy sauce, Kewpie mayo, sriracha, and sesame oil. Mix well until the salmon is evenly coated.
- Cut the nori sheets into squares large enough to fit into a muffin tin.
Assembly
- Lightly grease the muffin tin with cooking spray.
- Place a square of nori in each muffin tin slot, then add a spoonful of sushi rice to the center and gently press down. Repeat until each slot is filled, then layer the salmon mixture on top of the rice.
Baking
- Bake in the preheated oven for 15 minutes, or until the salmon is cooked through and the tops are golden brown.
Finishing Touches
- Once baked, remove the sushi cups from the oven and allow them to cool for a few minutes.
- Drizzle with additional sriracha or spicy mayo, then sprinkle furikake and chopped green onions on top. Serve immediately.
Make ahead by preparing rice and salmon mixture a day in advance. Store separately in airtight containers. Leftovers can be stored in an airtight container in the fridge for up to two days.