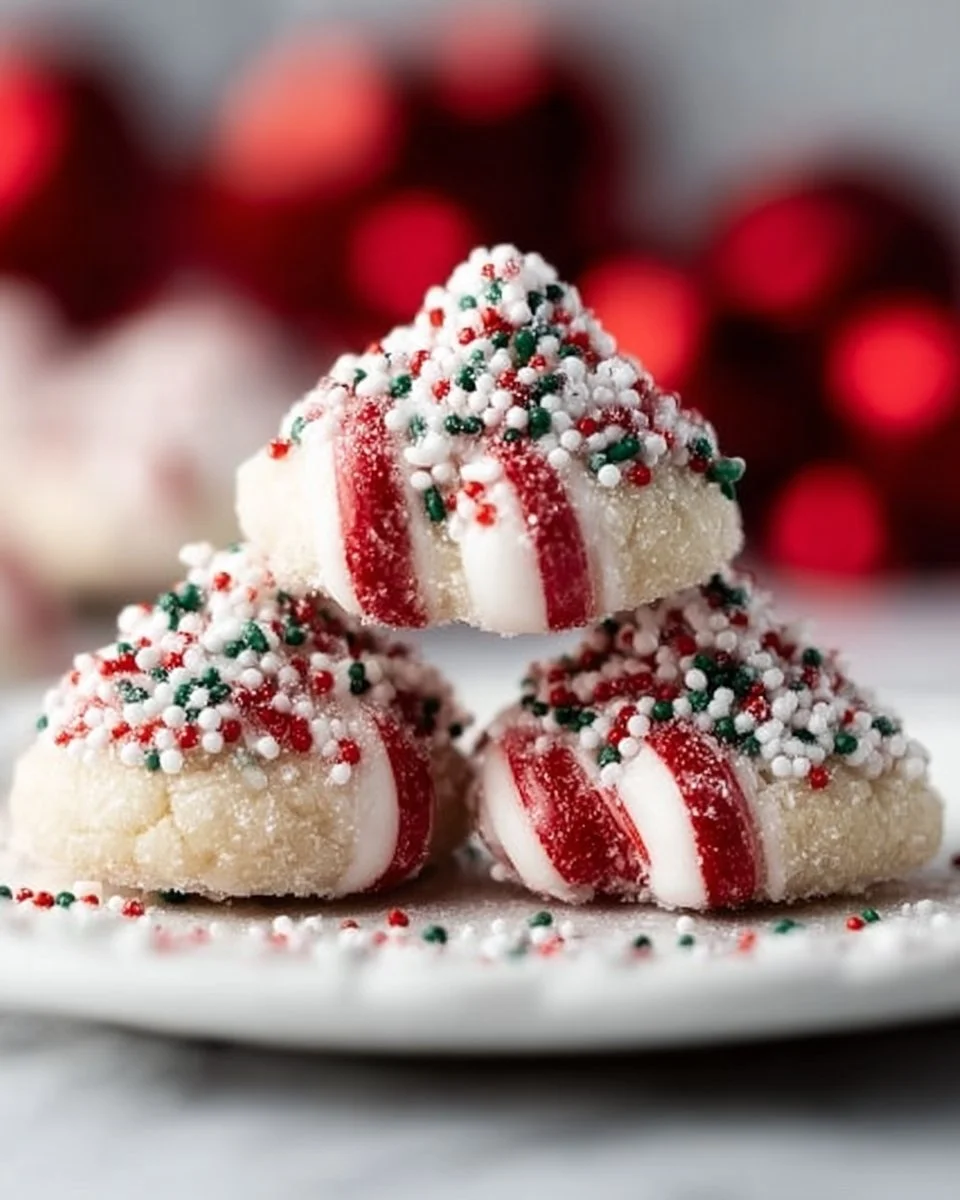
As the holiday season approaches, kitchens around the world become a flurry of activity, filled with the delightful scents of baking and the promise of sweet treats. One cookie that captures the essence of the season with its unique flavors and delightful presentation is the Sprinkle-Coated Candy Cane Kiss Cookies. These festive cookies not only combine the classic taste of chocolate and peppermint but also deliver an eye-catching presentation sure to impress family and friends.
In this article, we will explore everything you need to know about these delectable cookies, from ingredient insights to baking tips, variations, and even how to store them for maximum enjoyment. So grab your baking apron, and let’s dive into the wonderful world of Sprinkle-Coated Candy Cane Kiss Cookies!
The Allure of Candy Cane Kiss Cookies
These cookies charm everyone they encounter — from festive gatherings to cozy family nights. The perfect combination of sweet, minty chocolate meets the crunch of colorful sprinkles, making them irresistible. Candy Cane Kiss Cookies boast not only a vibrant splash of color but also an engaging texture that delights both young and old alike.
Why You Should Bake These Cookies
- Taste: The sweet chocolate flavor combined with refreshing peppermint is a match made in dessert heaven.
- Visual Appeal: With bright sprinkles and the iconic candy cane kiss on top, these cookies are as beautiful as they are delicious.
- Versatility: Perfect for holiday parties, cookie exchanges, or simply as a treat to lift your spirits!
Ingredient Breakdown
Understanding your ingredients is crucial for achieving the perfect Sprinkle-Coated Candy Cane Kiss Cookies. Here’s what you need and what each ingredient brings to the cookie jar.
Core Ingredients
- All-Purpose Flour: The backbone of the cookie, providing structure and the characteristic chewy texture.
- Unsweetened Cocoa Powder: Adds a rich chocolate flavor to the dough, balancing the sweetness of other ingredients.
- Granulated Sugar: Sweetens the cookies while playing a role in creating their texture.
- Butter: The foundation of flavor, butter helps to create a rich and tender cookie.
- Eggs: Bind the ingredients together and add moisture—after all, no one wants a dry cookie!
- Baking Powder: Helps the cookies rise, making them light and fluffy instead of dense.
- Vanilla Extract: Introduces a warm, comforting flavor—a must for any cookie recipe.
- Candy Cane Kisses: The star of the show! These chocolatey candies infused with peppermint become a decadent topping.
- Sprinkles: Not just for decoration, sprinkles add crunch and visual excitement to your finished cookies.
The Science Behind the Ingredients
- Flour and Sugar Ratios: The combination of flour and sugar in baking is critical; it affects the cookie height, spread, and chewiness. For perfect results, stick to the suggested ratios.
- Temperature Matters: Make sure your butter is at room temperature to ensure easy incorporation and create a uniform dough.
- Baking Time: Keep a close eye on your cookies in the oven to avoid overbaking, which can lead to dry cookies.
Step-by-Step Method
Creating the perfect Sprinkle-Coated Candy Cane Kiss Cookies is easier than you might think. Follow these step-by-step instructions for success:
Ingredients [Recipe Card]
| Ingredient              | Amount               |
|-------------------------|----------------------|
| All-Purpose Flour       | 2 cups               |
| Unsweetened Cocoa Powder | ½ cup                |
| Baking Powder           | 1 teaspoon           |
| Granulated Sugar        | 1 cup                |
| Butter (softened)       | ½ cup                |
| Eggs                    | 1 large              |
| Vanilla Extract         | 1 teaspoon           |
| Candy Cane Kisses       | 12 pieces            |
| Sprinkles               | ½ cup (for coating)  |
1. Preheat Your Oven
Start by preheating your oven to 350°F (175°C). This ensures that your cookies bake evenly.
2. Prepare the Cookie Sheet
Line a baking sheet with parchment paper to prevent sticking and to facilitate easy clean-up.
3. Mix Dry Ingredients
In a bowl, whisk together the flour, cocoa powder, and baking powder. This process helps to combine the ingredients evenly and ensures an even texture throughout.
4. Cream Butter and Sugar
In a large mixing bowl, use an electric mixer to cream the softened butter and granulated sugar until the mixture is light and fluffy. This should take about 3-5 minutes.
5. Incorporate Wet Ingredients
Add in the egg and vanilla extract, mixing well after each addition until combined. This will give your cookies their rich vanilla flavor and texture.
6. Gradually Add Dry Mixture
Slowly add the dry ingredient mixture into the wet ingredients, mixing until just combined. Avoid overmixing to maintain a soft cookie texture.
7. Roll the Dough
Scoop about a tablespoon of dough and roll it into a ball. Once all the dough is formed into balls, roll each ball in the sprinkles.
8. Bake Your Cookies
Place the cookie balls on the prepared baking sheet about 2 inches apart and bake in the preheated oven for 8-10 minutes. Remove them when they are set but still soft in the center—don’t worry; they will firm up as they cool.
9. Adding the Candy Cane Kisses
As soon as you remove the cookies from the oven, gently press a Candy Cane Kiss in the center of each cookie. The heat from the cookies will cause the chocolate to melt slightly, sticking the kiss in place.
10. Cool and Enjoy
Allow the cookies to cool on the baking sheet for 5 minutes before transferring them to a wire rack to cool completely.
Tips and Pro Advice
- Use Quality Ingredients: High-quality butter and Cocoa Powder make a noticeable difference in flavor.
- Temperature Check: Ensure your butter is softened but not melted; it’s essential for proper creaming with sugar.
- Prevent Spreading: If your dough seems too soft, refrigerate it for 30 minutes before baking to help maintain shape.
- Crowding: Space your cookies adequately on the baking sheet; they need room to spread.
- Avoid Overbaking: Keep checked on them; cookies should retain a slight softness in the center.
Variations and Swaps
Change things up with these fun substitutions and variations:
- Flour: For a gluten-free option, substitute all-purpose flour with a 1:1 gluten-free baking mix.
- Filling: You can use peppermint patties instead of Candy Cane Kisses for a different but equally delicious twist.
- Decorating: Try drizzling melted white chocolate over the cooled cookies for an even sweeter touch.
Storage and Reheating
Storage
Keep your Sprinkle-Coated Candy Cane Kiss Cookies in an airtight container at room temperature for up to one week. If you want them to last longer, consider refrigerating them or freezing them in a sealed container for up to three months.
Reheating
To reheat, simply pop them in the microwave for about 10-15 seconds or allow them to sit at room temperature for a bit. If you want that fresh-out-of-the-oven taste, bake them at 350°F for 3-4 minutes.
Nutritional Insights
Baking cookies is often about indulgence, but it’s essential to be mindful of what goes into our treats. Here’s a quick overview of the nutritional aspects of a single Sprinkle-Coated Candy Cane Kiss Cookie:
- Calories: Approximately 150-200 per cookie (varies based on exact ingredients)
- Fat: 8g (saturated fat from butter and candy)
- Carbohydrates: 22g (significant from sugar and flour)
- Protein: 2g (from the egg and flour)
- Sugars: 10g (from granulated sugar and candy), but you can adapt this if you wish to use healthier alternatives.
FAQs
Can I make these cookies ahead of time?
Absolutely! You can prepare the dough and refrigerate it for up to three days before baking.
Are there allergen-friendly versions of this recipe?
Yes! Use gluten-free flour for gluten sensitivity, and replace eggs with flaxseeds mixed with water for a vegan version.
What should I do if my cookies spread too much?
Make sure your butter is at the right temperature. If the dough was mixed too long, it could lead to excess spreading—consider chilling it before baking.
How do I make these cookies more festive?
Consider adding a touch of crushed candy canes to the dough before baking for a more prominent peppermint flavor and texture.
Conclusion
Making Sprinkle-Coated Candy Cane Kiss Cookies is not only a splendid way to indulge but also a delightful activity to share with loved ones during the holiday season. With their festive colors and scrumptiously sweet taste, these cookies are bound to be a showstopper at any gathering.
So gather your ingredients and start baking! Enjoy the process, share your creations, and most importantly, savor each delicious bite. Don’t forget to save or share this recipe with friends as they will definitely want to full experience!
Happy baking and may your holiday season be filled with sweetness!
Print
Sprinkle-Coated Candy Cane Kiss Cookies
- Total Time: 30 minutes
- Yield: 12 cookies 1x
- Diet: Vegetarian
Description
Delightful cookies that combine chocolate and peppermint, ideal for holiday gatherings.
Ingredients
- 2 cups All-Purpose Flour
- ½ cup Unsweetened Cocoa Powder
- 1 teaspoon Baking Powder
- 1 cup Granulated Sugar
- ½ cup Butter (softened)
- 1 large Egg
- 1 teaspoon Vanilla Extract
- 12 pieces Candy Cane Kisses
- ½ cup Sprinkles (for coating)
Instructions
- Preheat your oven to 350°F (175°C).
- Line a baking sheet with parchment paper.
- In a bowl, whisk together flour, cocoa powder, and baking powder.
- Cream together the softened butter and granulated sugar until light and fluffy.
- Add in the egg and vanilla extract, mixing well.
- Gradually add the dry mixture to the wet ingredients, mixing until just combined.
- Scoop about a tablespoon of dough and roll into a ball, then roll in sprinkles.
- Place on the baking sheet about 2 inches apart and bake for 8-10 minutes.
- Once removed from the oven, gently press a Candy Cane Kiss in the center of each cookie.
- Allow to cool on the baking sheet for 5 minutes before transferring to a wire rack.
Notes
Use high-quality ingredients for the best flavor. If dough is too soft, refrigerate before baking.
- Prep Time: 20 minutes
- Cook Time: 10 minutes
- Category: Dessert
- Method: Baking
- Cuisine: American
Nutrition
- Serving Size: 1 cookie
- Calories: 175
- Sugar: 10g
- Sodium: 100mg
- Fat: 8g
- Saturated Fat: 5g
- Unsaturated Fat: 3g
- Trans Fat: 0g
- Carbohydrates: 22g
- Fiber: 1g
- Protein: 2g
- Cholesterol: 30mg
Keywords: cookies, candy cane, holiday, dessert, festive